Learn why you should build demos for your Machine Learning models in 2022, and how to do it in a way that fits your needs, skills, and audience.
Why Demos Are Now Essential
Interactive demos of machine learning models are getting increasingly popular. After all, just like a picture paints a thousand words, nothing beats letting others interact directly with your model to generate interest. If you are interested in keeping up with recent trends or are looking for inspiration for your own demos, I highly recommend following the @ak92501 twitter account.
One example among many is a demo for a model transforming a portrait photograph into an illustration in the style used by the Netflix show Arcane. The ease of use of the demo and ability to quickly test the model with different input photographs was part of the reason why this project became so popular so quickly.
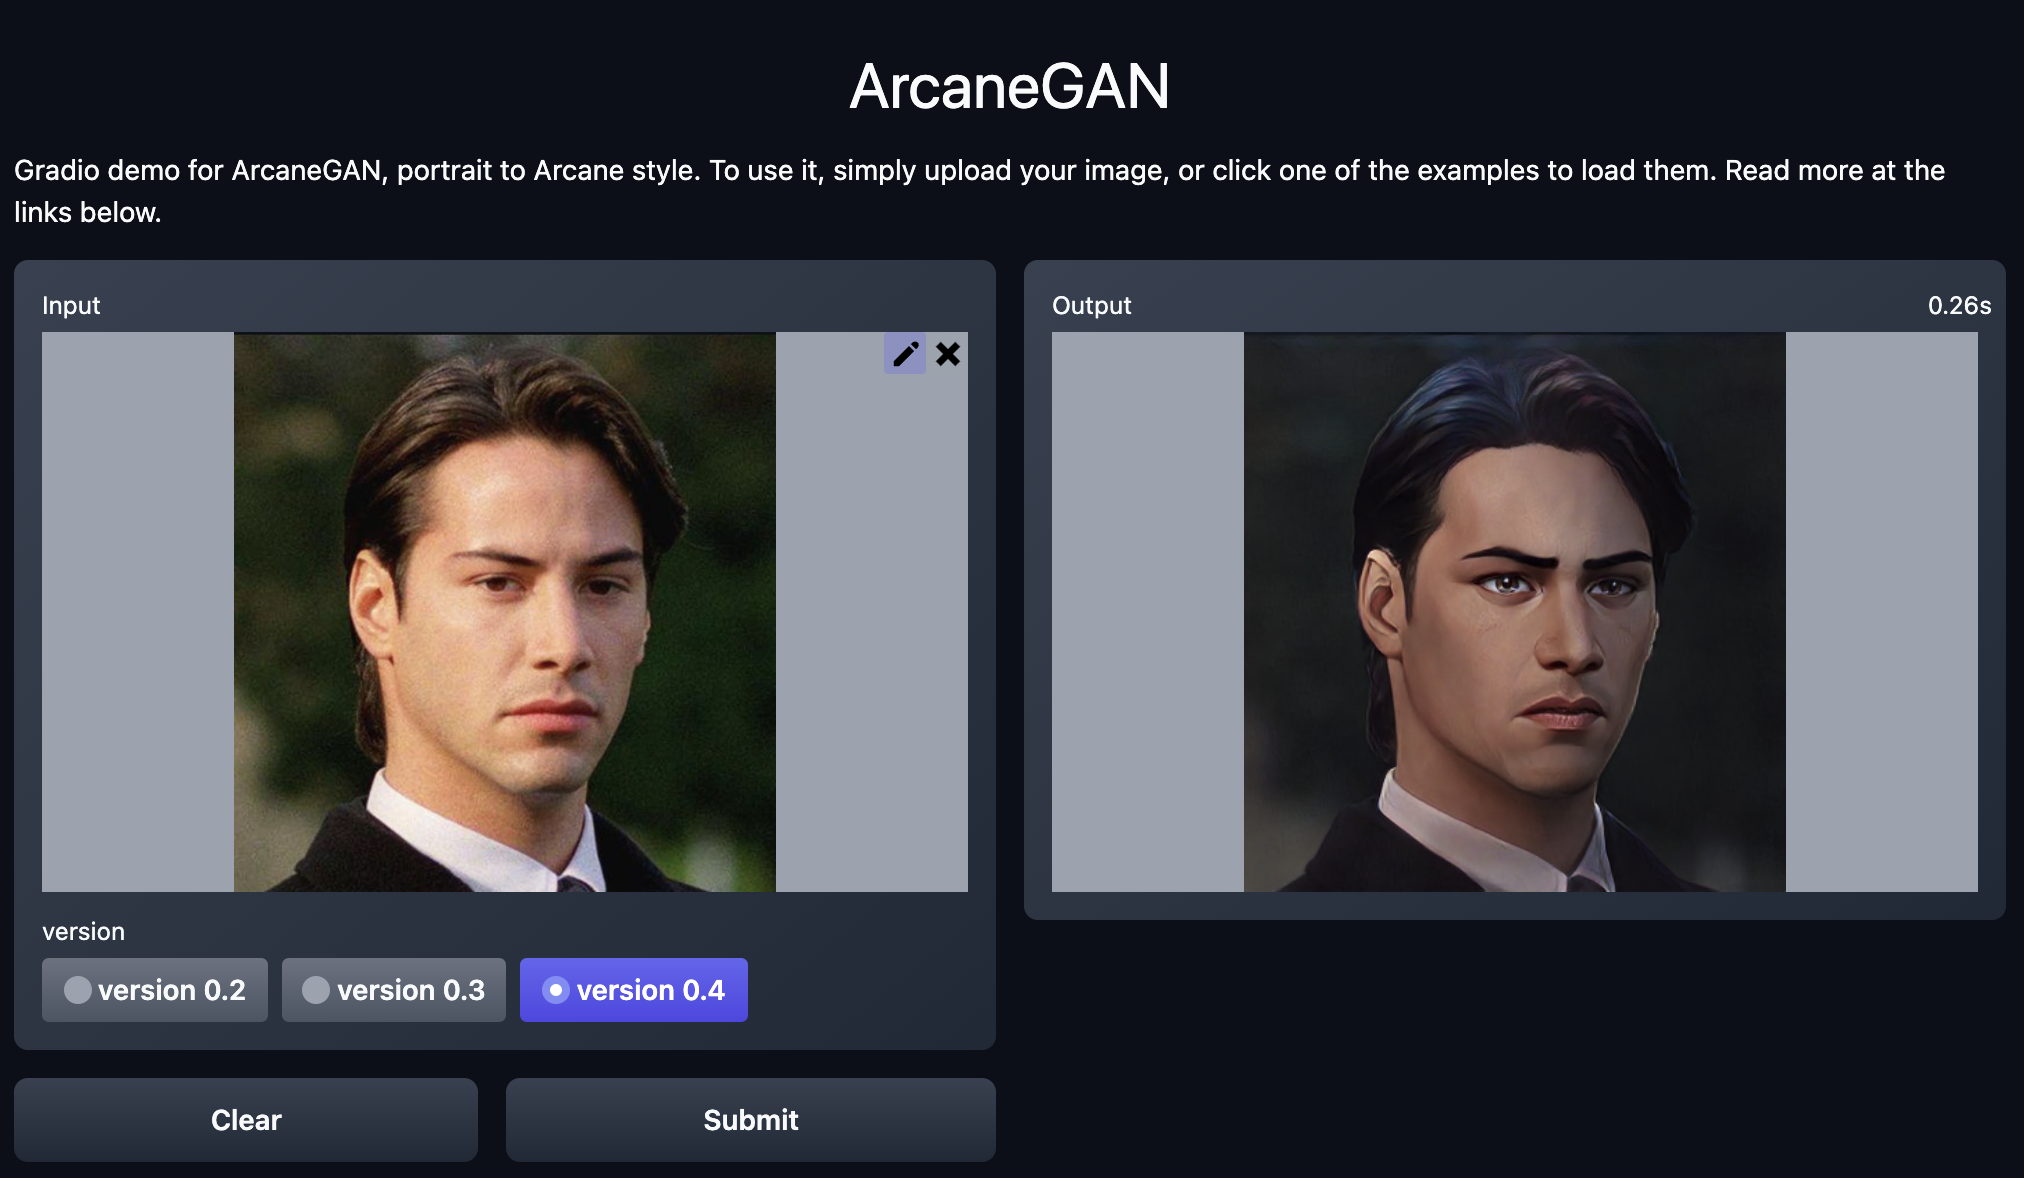
Interactive demo for ArcaneGAN (using Gradio). Screenshot by author, demo located at https://huggingface.co/spaces/akhaliq/ArcaneGAN
There are many reasons why you might want to build an interactive demo:
- Getting a model tested by colleagues during development
- Prototype to seek investment in a new idea
- Disseminate research, potentially as a companion to a research paper
- Build a portfolio of work
Whatever your reason is, this article will provide some pointers and recommendations to make the most of this opportunity.
How To Build An Interactive Demo in 2022
There are a variety of ways to build an interactive demo for your Machine Learning model in 2022. Which one you pick will depend on:
- Your target audience
- Your software engineering skills
- Your monetary budget
- Your time budget
This article will cover three types of approaches: public notebook sharing, full-stack, and app libraries.
TLDR - Which Approach Should I Use?
The rest of the article will cover in details what you need to know about these three approaches. If you want a quick answer, the following table should help!
| Google Colab | Full-Stack | App Libraries | ||
|---|---|---|---|---|
| Flexibility | Low | High | Moderate to High | |
| Target Audience | Technical | Any | Any | |
| Interactivity | Low by Default | High | High | |
| Non-ML dev work required | None | Significant | Minimal | |
| Deployment / Sharing | Easy | Difficult | Easy | |
| Costs | Free | Low to High | Free | |
| Time commitment | Small | High | Small to Moderate | |
| Productization | No | Yes | Case by Case |
Rule of thumb:
- Sharing with a technical audience where code visibility is useful and interactivity not critical? Use Google Colab (or equivalent)
- High likelihood for the demo to become a fully fledged product? Going the Full-Stack approach might save you time in the long run
- If none of the above, go with App Libraries and Hugging Face Spaces hosting
Public Notebook Sharing (Google Colab)
Jupyter notebooks (and iPython before it) played a big part in cementing Python as the leading programming language for machine learning. While not without their faults, by enabling interactive data exploration and iterative development, notebooks quickly became an essential tool for machine learning enthusiasts. However, setting up a Jupyter environment can be challenging and potentially costly if hosting is required for remote access.
Google Colab was a significant disruptor in this area – it democratized machine learning by offering a fully managed notebook experience without any setup or maintenance required, and provided free access to otherwise costly compute resources.
Colab made it trivial to share a notebook and have others interact with it, even if it required GPU acceleration. For example, the fastai documentation or even the recent fastai book are made available as Colab notebooks, allowing one to run and modify code as they go through the material.

Screenshot of the quick start notebook for fastai in Google Colab. Screenshot by author, notebook located at https://colab.research.google.com/github/fastai/fastai/blob/master/nbs/quick_start.ipynb
Most notebooks can be made to work on Colab without much work required, and some widgets can be used to let users input their own data. If the notebook is versioned on a public Github repo, all it takes to share it is share a link with the following format:
https://colab.research.google.com/github/$ACCOUNT/$REPO/blob/$BRANCH/$PATH_TO_NOTEBOOK
where $ACCOUNT is the Github account, $REPO the repository, $BRANCH the branch, and $PATH_TO_NOTEBOOK the full path the the ipynb file.
Colab notebooks are not the best option if you are interested in sharing your work with the general public. However, they are very powerful tools to easily convey ideas to technical peers. So much so that pretty much all new developments in machine learning tend to come with a companion Colab notebook as standard. As an example, I explored a brand new approach to patch-based self-supervision using the Colab provided with my own input data (in this case, photographs of my cat Jasmine). It allowed me to get a much better understanding of this new research, at no cost to me.
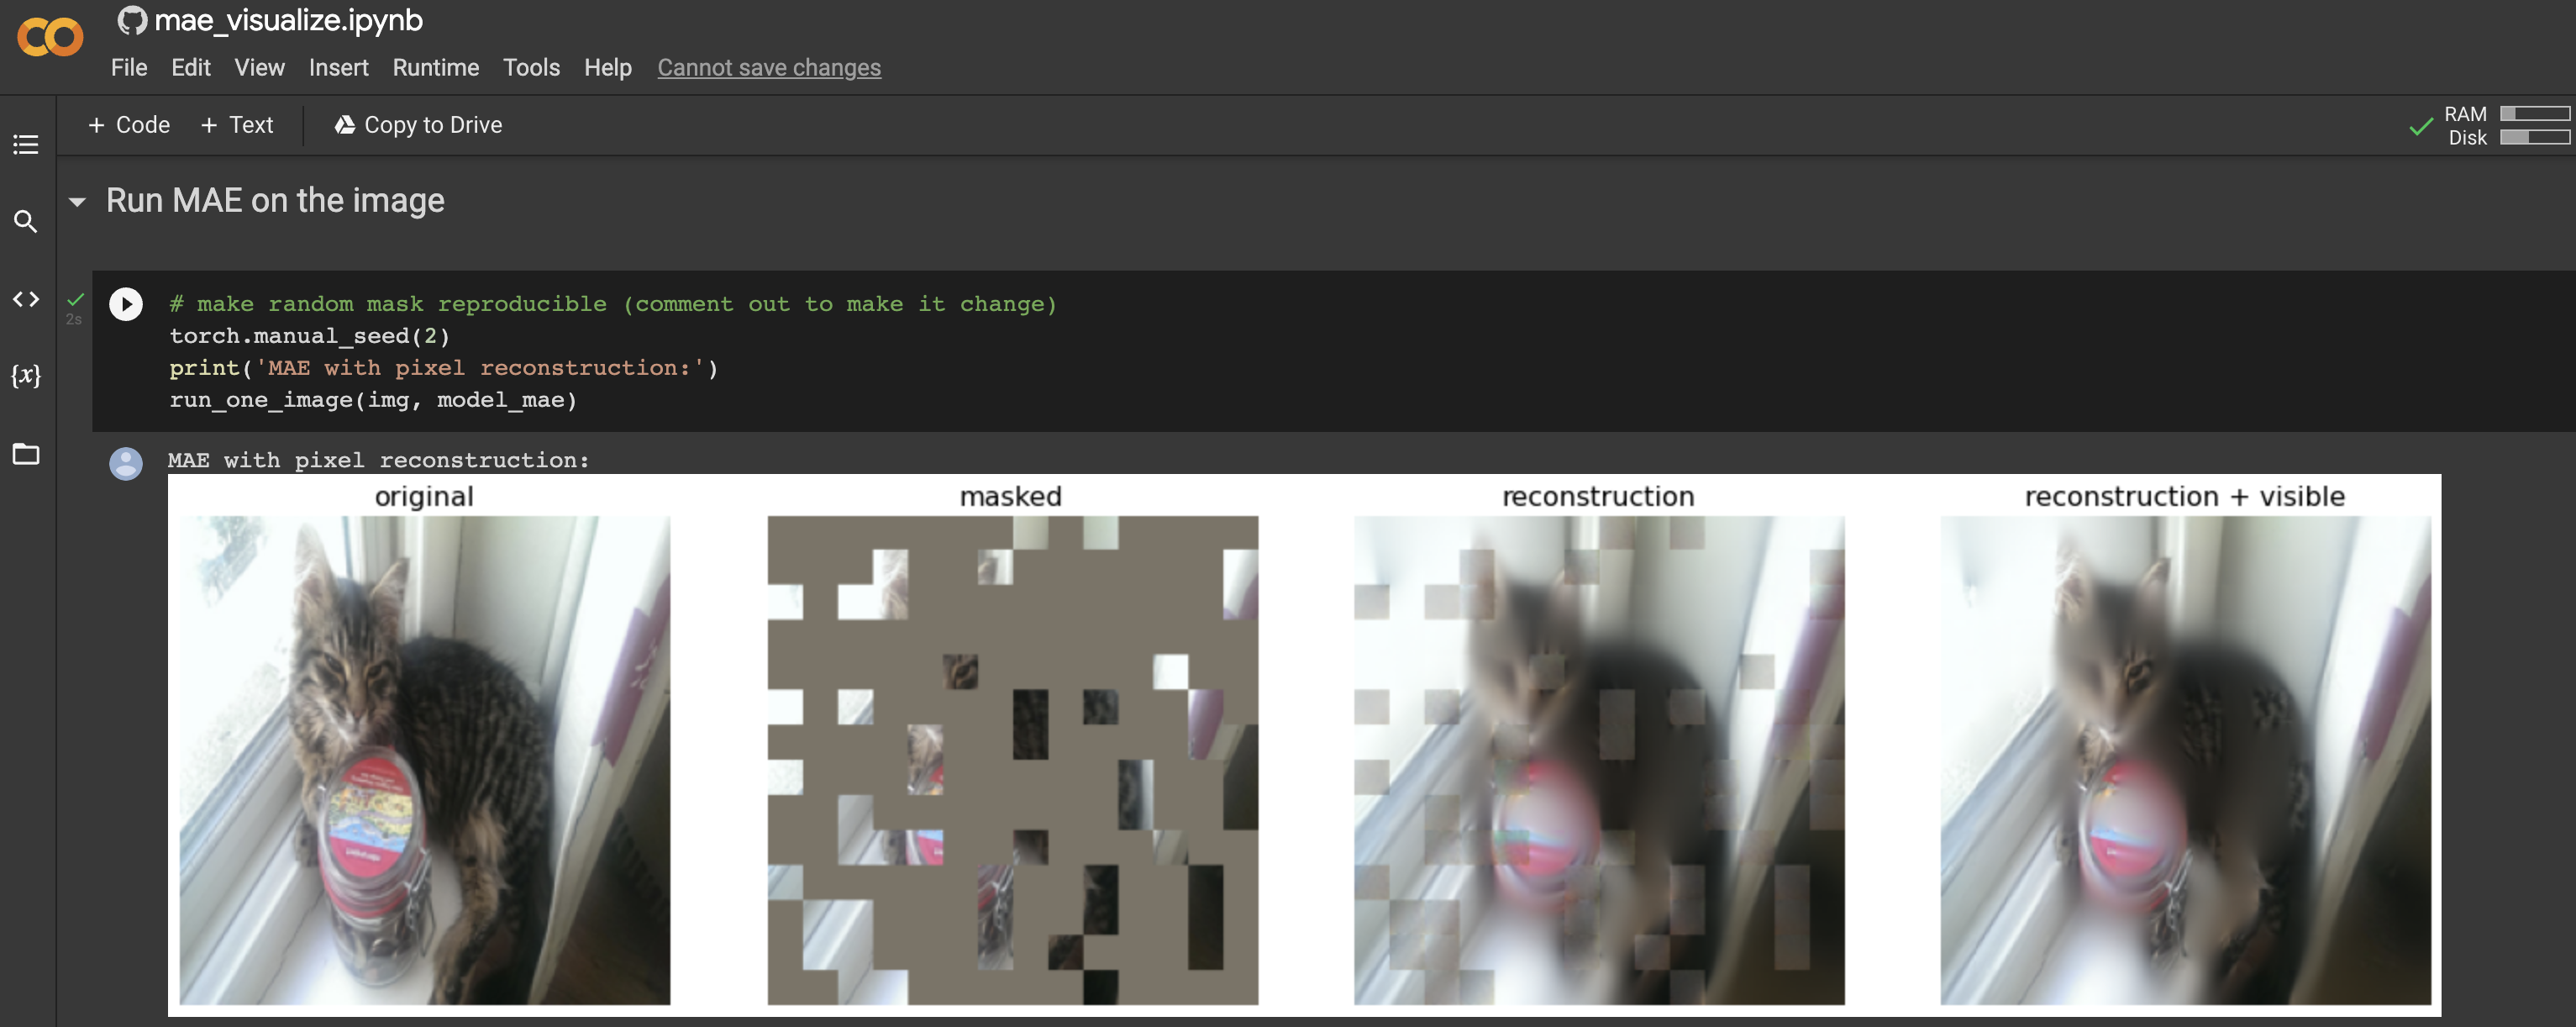
Screenshot of a Google Colab for a new self-supervision method featuring my cat Jasmine, notebook located at https://colab.research.google.com/github/facebookresearch/mae/blob/main/demo/mae_visualize.ipynb
Overall, interactivity is pretty limited. A possible way around this is the use of a library such as Gradio, which allows the creation of basic user interfaces directly in a notebook. Gradio will be covered in detail in the app libraries section.
For completeness' sake, I should mention that Amazon Web Services announced SageMaker Studio Lab, which is similar to Google Colab with some advantages such as persistent storage. I haven’t had a chance to explore it yet, but it could in theory be used in a similar way to Google Colab.
Pros of Colab notebooks:
- Free access to GPU compute
- Tight integration with Git to facilitate sharing
- Fully managed, no setup or maintenance
Cons of Colab notebooks:
- Limited to technical audiences, no suitable for a lay audience
- Limited interactivity by default, can be improved with libraries such as Gradio
- GPU availability can be hit or miss
- Some external storage required (e.g. to store model artefacts)
Full-stack
This approach to creating an interactive demo is the most demanding, but potentially one that will pay off in the long run. It is full-stack, because it involves two components:
- A back end responsible for loading and serving the model as a REST API
- A front end to provide UI elements to interact with the back-end
The obvious downside is that it requires to be comfortable working on both those components, or at least be willing to learn. However, this approach is the most flexible, and can be used as a stepping stone to deploy a fully fledged production environment without starting from scratch.
Before diving into the back and front end components below, let’s have a look at the pros and cons of the full-stack approach.
Pros of the full-stack approach:
- As flexible as needed
- Can include additional features such as authentication
- Can be used as a basis for production deployment without starting from scratch
- Can be optimized for performance
Cons of the full-stack approach:
- Knowledge in back and front end development required
- Time consuming development and deployment
- Requires infrastructure for deployment
Back End
An exhaustive discussion of the different technology stacks for back end development is out of scope of this article. However, given that most machine learning engineers working on machine learning applications are at least familiar with Python, we will focus on Python-based back end solutions.
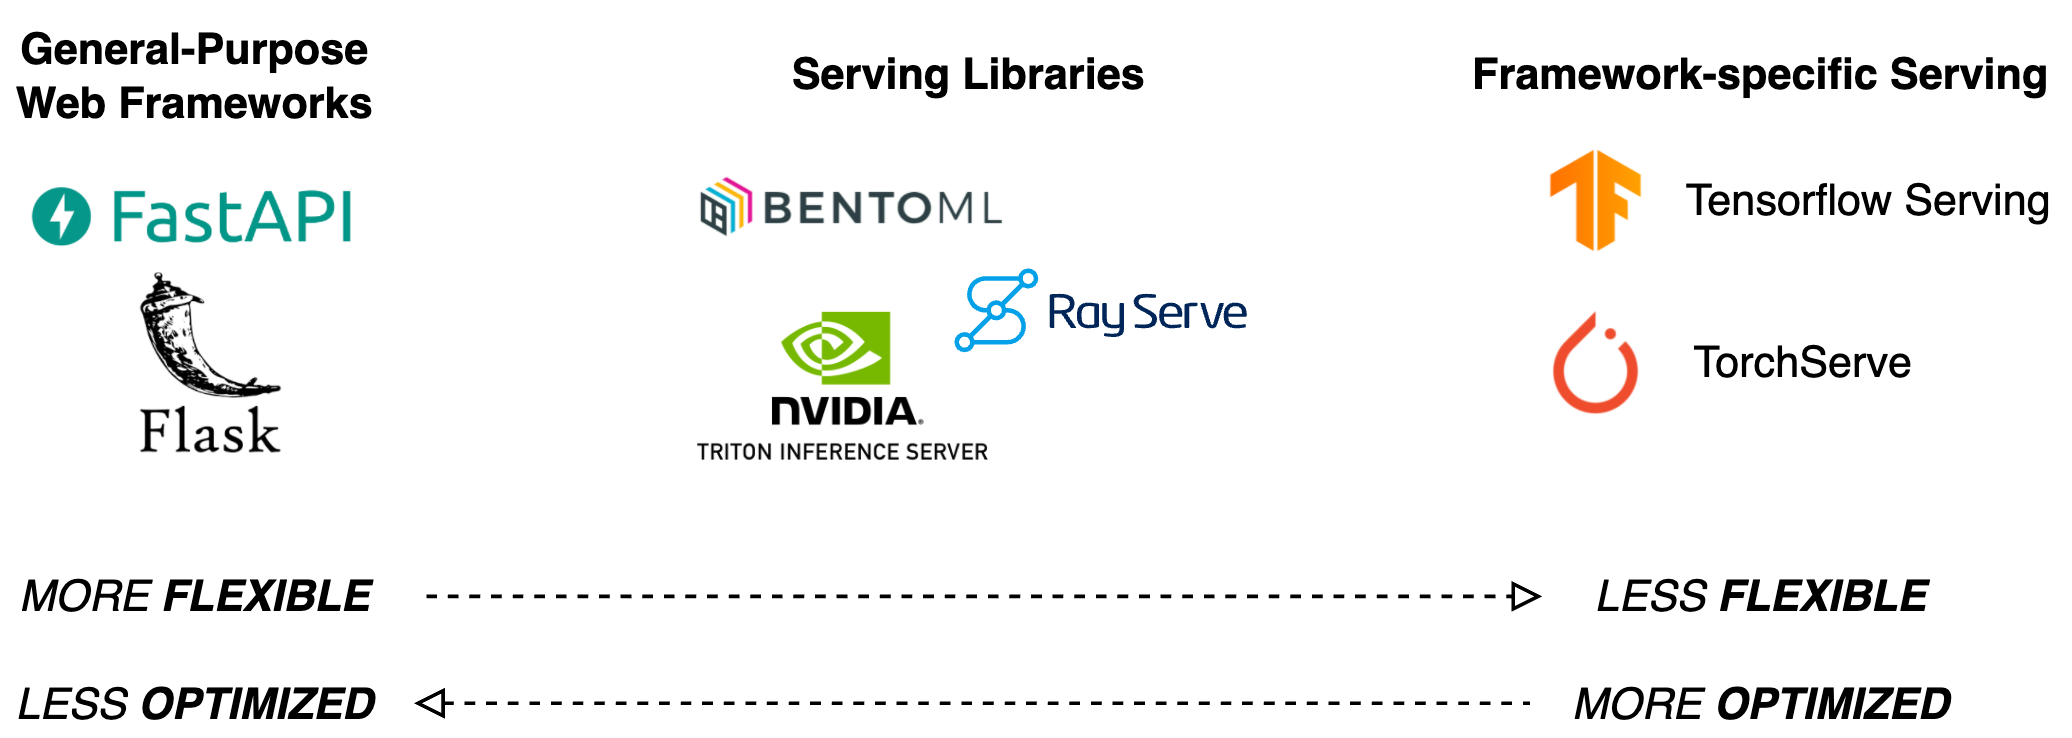
Different tools for back end development: general-purpose web frameworks, serving libraries, and framework-specific serving libraries. Image by the author.
The goal of the back end is to act as a wrapper for a model so that it can be queried via HTTP requests from the front end, something referred to as model serving. In order to do so, one would typically use a web framework. For a long time, Flask was the standard for Python-based web frameworks, and is indeed still very popular. However, FastaAPI is quickly becoming the new favorite, thanks to impressive performance and native support for asynchronous operations. This article is a good starting point to understand how a simple model can be deployed using FastAPI, while this tutorial provides a complete overview of all the steps required to serve a PyTorch model with GPU support.
Using a general-purpose framework such as FastAPI involves writing a lot of boilerplate code just to get your API endpoint up and running. If deploying a model for a demo is the only thing you are interested in and you do not mind losing some flexibility, you might want to use a specialized serving framework instead. One example is BentoML, which will allow you to get an optimized serving endpoint for your model up and running much faster and with less overhead than a generic web framework. Framework-specific serving solutions such as Tensorflow Serving and TorchServe typically offer optimized performance but can only be used to serve models trained using Tensorflow or PyTorch, respectively.
Front End
The front end is responsible for providing a user interface to interact with the back end serving the model. In most cases, it will be a mean to input data (such as text for natural language processing, or images for computer vision) and to display model outputs. Having this user interface live in a web browser makes your demo accessible without additional dependencies.
Front end development is where you will likely have to leave Python behind. While libraries such as Skulpt and Brython enable the use of Python in the browser, I highly recommend using Javascript as the very large community means that tutorials are numerous, and it will be much easier to seek help if needed. The two most popular libraries to build user interfaces in Javascript are React (tutorial for ML demo) and Vue.js (tutorial for ML demo). Using a general-purpose framework will give the flexibility needed to tailor the UI to your exact requirements.
Deployment
Once your back and front end components are ready, they must be deployed somewhere publicly accessible. Again, flexibility is the name of the game here. Services like Heroku offer a managed (and free, depending on usage) experience for deployment of applications. Public cloud providers such as Amazon Web Services, Azure, or Google Cloud could be an option and a small demo would likely fit nicely within their free tier offerings.
Whatever path you decide to take, I recommend you consider containerization of your demo using Docker. This way, the same exact container image is used for local testing during development and for deployment on your hosting provider, helping avoid bad surprises due to changes in environment.
App Libraries
So what if you want something almost as flexible as what is possible with the full-stack approach, but without the development requirements? Well, you are in luck because the past few years have seen the emergence of Python libraries that allow the creation of impressively interactive demos with only a few lines of code. In this article, we are going to focus on two of the most promising libraries: Gradio and Streamlit. There are notable differences between the two that will be explored below, but the high level idea is the same: eliminate most of the painful back and front end work outlined in the full-stack section, albeit at the cost of some flexibility.
Gradio
Gradio was already mentioned in the Google Colab section as it can be used to add interactive elements to notebooks. As shown in the library’s getting started page, building an interface only takes a few lines of Python code.
import gradio as gr

def greet(name):
  return "Hello " + name + "!!"

iface = gr.Interface(fn=greet, inputs="text", outputs="text")
iface.launch()
If you are working in a notebook, the UI will show right there and then. If running from a script, a browser window will open and point to http://localhost:7860. The reason why this works is that Gradio essentially runs an API server in the background for you, thus taking care of much of the work discussed in the full-stack section. It used to leverage Flask to create the local API server, but it very recently switched to using FastAPI.
In the code snippet above, the greet function would be replaced with the inference code for your model. Note that both inputs and outputs are set to text, so the UI will automatically default to the widgets necessary to handle text-based tasks. Similar widgets exist for most common use-cases, including computer vision and audio processing. In addition, Gradio offers very handy features such as the ability to take a screenshot or for the user to flag if the output shown is unexpected (e.g. if processing failed).
If you want to share your user interface with the world, using the share=True argument in the launch method will provide you with a gradio.app URL that points to your demo. Note that this is only forwarding request to your machine, so it will only work as long as your script or notebook is running, and the link automatically expires after 72 hours. See the section about hosting below as a way around those limitations.
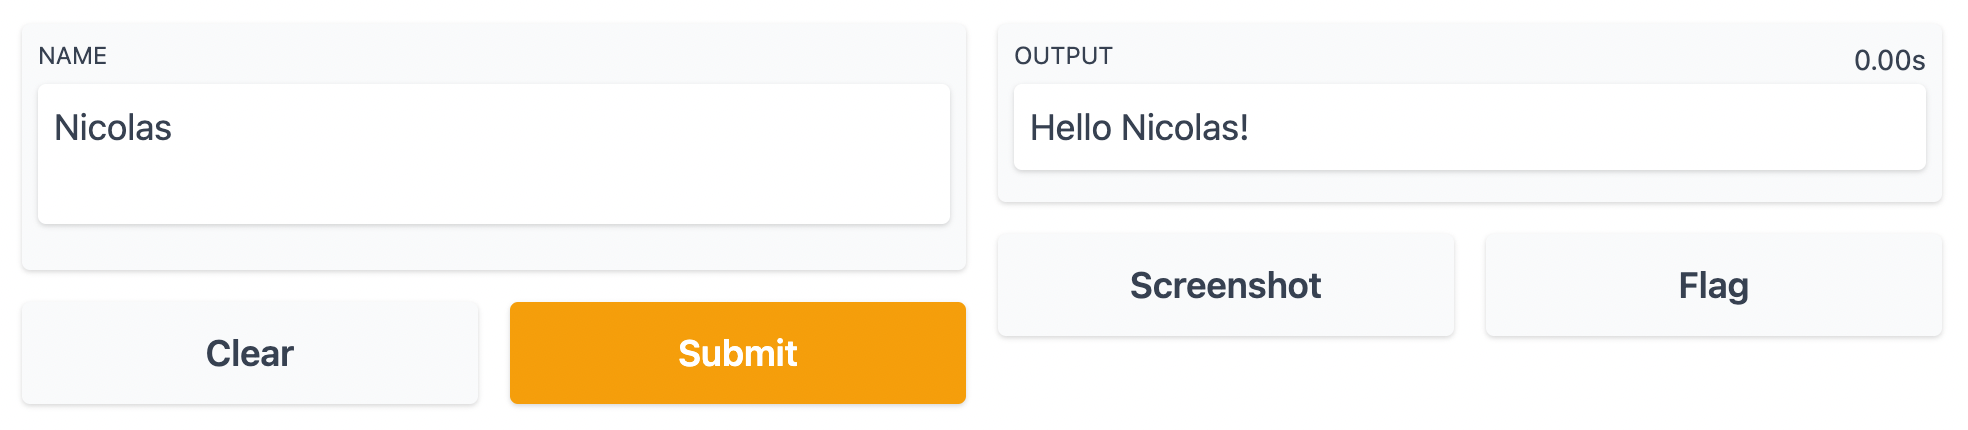
Default Gradio UI for text inputs and outputs produced by a few lines of code. Screenshot by the author.
Gradio is laser-focused on building user interfaces for machine learning models, and this focus means that it will take care of almost everything for you and will work out of the box with very little configuration required.
Pros of Gradio:
- Quick and easy setup out of the box
- Runs directly in notebooks
- Absolutely no knowledge of web development required
- Apps are easily shared
- Good selection of built-in UI elements
- Features such as screenshots or output flagging are very handy for demos
Cons of Gradio:
- Limited control over the UI layout
- Not suitable for complex apps (e.g. state management, caching)
Streamlit
Streamlit is a library to build and share data apps. Their curated gallery showcases examples of data visualization apps, dashboards, interactive tutorials, and, of course, machine learning demos.
Streamlit can be used to build complex applications, which comes at the cost of a higher barrier of entry compared to Gradio. For example, it cannot be run directly in a notebook – a command line tool is used to start the application from a script. A live reload approach is adopted, whereby changes made to the code are automatically reflected in the application running in the browser, allowing for quick iterations.
Streamlit comes with advanced features such as caching, which can help prevent long running tasks (for example downloading and preparing a model for inference) to not be ran multiple times unnecessarily and the ability to build stateful applications (where information is preserved for the duration of a user session). Those features enable use-cases beyond simple machine learning demos. On the UI side of things, the library has a large number of built-in widgets and can be further extended through the support of third-party components.
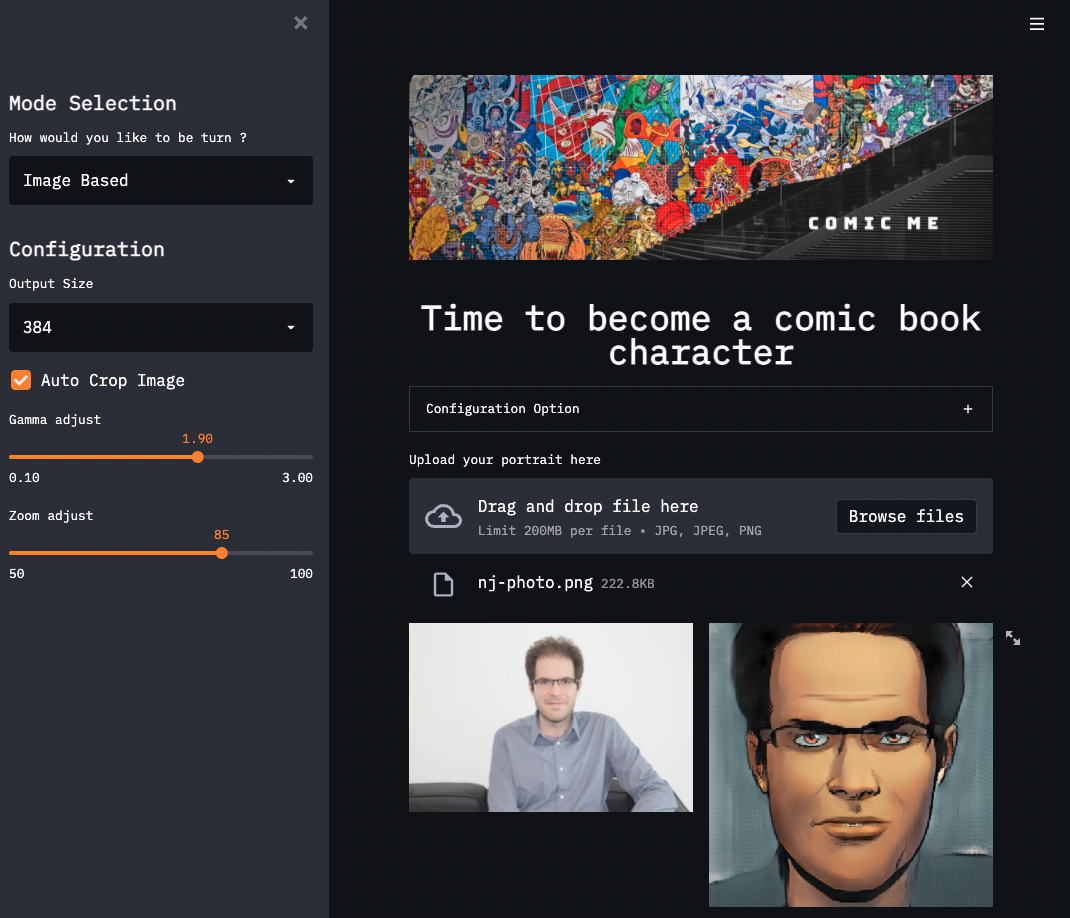
A streamlit app converting portrait photographs to comic book characters. Screenshot by author, demo located at https://share.streamlit.io/nathannguyen-dev/comic_me_v1/main.py
Streamlit offers a managed service for app sharing called Streamlit Cloud. As of this writing, one private (requiring authentication) and unlimited public apps can be deployed using Streamlit Cloud with the free plan. Alternatively, Streamlit apps are easily containerized and deployed using Docker.
If you are interested in deploying both Gradio and Streamlit apps, Hugging Face Spaces might be the way to go.
Pros of Streamlit:
- Quick setup
- Advanced features such as caching and state management allow for complex apps to be built
- Large selection of built-in UI widgets
- Highly customizable UI layout
- Extensible through support for custom third-party components
Cons of Streamlit:
- Sharing applications is not as trivial as it is using Gradio
- Complex apps require some understanding of advanced web development concepts
- Not compatible with notebooks
- Lacking some basic built-in features for ML demos (e.g. flagging of unexpected inputs/outputs)
The Hugging Face Spaces Revolution
Deploying apps developed using either Gradio or Streamlit got a whole lot easier when Hugging Face added Spaces to their ecosystem of ML products and tools. Spaces are similar to Github Pages – code is committed to a repository, and the app is automatically build and served. When creating a space, you pick between Streamlit, Gradio, and Static (which more or less replicates Github Pages' static website hosting capabilities). The Space is then automatically setup to accommodate your library of choice. Useful features such as versioning and the ability for users to like a space make it a great experience for the deployment of a public machine learning demo.
Similarly to how Google Colab democratized access to compute resources required for state-of-the-art machine learning models, Hugging Face Spaces allow anyone to host a demo for the world to check out. This means that the entire machine learning workflow, from model training to deployment of an interactive demo, can now be carried out for free and almost entirely in Python.